11.16.2012

The creation of Mommy Time

As you may recall, it drives me NUTS when Chloe doesn't nap.  Over the summer, I had fantasies about how life would be after preschool started and Aria was born, with marvelous naps after lunch for both girls and a little bit of quiet alone time for me. (Dream on!)

Reality, for the first several weeks after Aria was born, I spent countless hours a week angry.  Angry because I could not control nap time as I had envisioned mainly (and really tired from all the colicky crying too).  I would fight with Chloe every single day about staying in bed.  I told her "I don't care if you sleep, but you have to stay in bed and stay quiet" and to no avail... she would win every single day and I would end up drained, completely. I couldn't do it anymore, I was losing my mind between the fighting and the crying. Thus the creation of Mommy Time.

I sat down with Chloe one afternoon, after I lost it yet again during one of our battles, and we worked out the details. You no longer have to stay in bed or your room but...

  • You cannot follow Mommy around while I do things
  • You must play quietly where ever you choose
  • You cannot help Mommy with any chores I'm working on
  • Mommy Time is not for talking or asking questions
Sounds a little rough on paper.. but it has been a life saver.  The fights stopped, I feel thousands of times less stressed during "nap time", Chloe is happy as a lark, and Aria sleeps better.  Typically Mommy Time involves Chloe cuddled on the couch with a movie of her choosing (Alvin and the Chipmucks everyday for 10 days... OMG) and me doing whatever I need or want.

*Bonus - if she's had a rough morning and hasn't been a good listener or kind, she knows that I can revoke Mommy Time and turn it back into Rest Time as I see fit - (much like today as she yells as me from her bed while I type this post).

What do you do during rest time to ensure some sanity?

Until next time... XO!

11.14.2012

Closet Overhaul

It's been 10 weeks since Aria was born... 10 weeks! ... and I still don't fit into my jeans.  UGH.

I have 1 pair of jeans that have always been very big and (I can't believe I'm saying this but..) they are the only jeans I've been wearing for nearly 10 weeks.  Ridiculous.

In other clothing news... I am also having trouble feeling comfortable in any of my shirts (not size comfortable, but how my body looks).  My typical days includes throwing on another T-shirt and my only pair of jeans, take Chloe to school, come home and switch to sweatpants, repeat to pick her up.  I hate that.

 I hate it so much in fact that this is what I spent today doing:
With the exception of a few pairs of jeans that I know don't fit yet... this is all of my clothes, so sad

I emptied every drawer, every hanger, every laundry basket (after a laundry spree, it's all clean expect for what I was currently wearing - small victory around here).  I sorted all of it into piles - T-shirts, tanks/camis, sweats, sweaters, skirts, etc.
Then came the hard part.  I put on every shirt I own and made an impulsive decision to keep or toss.

First came tank tops and cami's... most of them are for under things so it was fairly easy decision - if they fit they stayed. The left is the starting pile, the right is the keepers.
Next came T-shirts... my most embarrassing pile.  Almost all of these shirts were from high school/college or free.  (Am I the only one who feels obligated to keep stupid shirts because they were free and ya never know when you may need a shirt to paint in or... lounge in... or...)
My most dramatic cutting by far.  Left is toss, right is keep.
I went through sweaters
I widdled down the sweatshirts and sweatpants by several pairs and discovered a couple more pairs of jeans that fit I had stored away when I started wearing maternity clothes (Happy Day!)

By the end of my painful task, I realized several things. 
  1. I have mostly black or white clothing... I have no idea why
  2. I do not stop and think about clothing purchases for long enough.  I had many pieces of clothing that I know I haven't liked since day 1, but continued to fold them and put them away.
  3. I love (HATE) Pinterest for making me so self-conscious about my wardrobe with all of there cute outfits pins. 
  4. Time to go shopping and hope for better and longer lasting decisions. 
These is what went back into drawers and onto hangers (expect of the cutey helper of course).
Do you have troubles with hating your clothing or is it just my post-baby (won't go back to where it was - damn second pregnancy body)?

Until next time... XO!

11.11.2012

$2 Tutorial for Wall Art

A few months before Aria was born, we moved Chloe from her room to another room so we wouldn't have to change much for the nursery.  (It was already pick, the crib fit well along with the changing table.. ya know).  But with such an easy transition from toddler room to nursery again, all the wall art stayed the same from Chloe.  I wanted to make something specifically for Aria - I'm feeling guilty because she doesn't get a lot of her own things.. mostly hand-me-downs (clothes, toys, wall art).  After standing in her room for a few minutes to decide what the "theme" really is in there... I decided on some pretty pink butterflies for her.  
Here is the steps I took in creating this look for approximately $2! 

I had the picture frames that I picked up at the Target Dollar Spot ages ago and never really had a plan for them.  They came in a pack of 3 and they are 5x7.  I began by cutting white cardstock to fit inside the frame using the temporary picture that comes inside frames. 
If you don't have one, this grid cutter is a great asset to any crafter's home
I googled images that I wanted and converted them to a .studio file so I could cut them on my Silhouette Cameo (LOVE IT!) 
Don't mind the mat... it's well loved
I peeled the butterflies off the mat and centered them onto the cardstock and inserted them into the frame.  TIP: before putting the back of the frame on, pick it up and check the look of the picture - there's nothing more annoying than having to pull up the little metal brackets again because your image is off center. 
Because my frames were so cheap, they didn't come with a wall hanging bracket on the back so I had to do some problem solving.  I considered using the pop top trick like I did with my fabric wall art but I went with some ribbon to give it a little more "length" in the art. 
Hot glue the ribbon to the frame. 
Tie until you are satisfied with the bow and there you have it! 
I cut my ribbon a little short and was not happy with the bow I was able to produce so I tried a different approach to "fake" a bow. 
Cross the ribbons as high as you'd like the nail to hang and hot glue together.  Fold over 1 side of the ribbon, glue and fold over the other side, glue. 
To hide the fact that this bow isn't really tied, I picked out some buttons and jewels to dazzle the center of the bow.  
And there you have it.  Super cute wall art for less than $2 in materials (including frames!) The whole project took about 30 minutes with a 3 year old bugging me to help and begging for them to be in her room. 

Best of luck... XO

11.05.2012

Baby Blanket tutorial

I love getting back to my sewing machine the last couple of weeks.  It has been quite a long while (months to be honest) and I'm happy to be finding some time during our hectic schedule.

The hubby's counterpart at work recently had a baby and Ed wanted to give them something sweet and pink for their first girl.  Normally, I would make a shirt like the one I made for my cousin's birthday the other day
but I had just stumbled upon a minky tips Pinterest post and wanted to give a minky blanket a try (especially since our oldest's favorite blanket is minky and she is wearing it out rather quickly).
  1. I began with preshrinking the flannel material I got (Minky does not shrink so it's up to you if you wash it first)
  2. Cut the material to size.  I cut both materials 41x41 - I only had to trim a little off the side with the JoAnn's Fabric advertising
  3. Begin pinning with pretty sides together.  This was a tip from the Pinterest post... pin every 1-1 1/2". As a sewer who kind of hates pinning and usually does bare minimal pinning, I heeded their warning and did as told.
   4.  After pinning your heart out, begin sewing.  I used a 1/4 seam from the edge of the flannel material.      Don't forget to leave 5-6 inches to turn your blanket right side out.  BEFORE flipping, trim off the excess minky to avoid bulky edges. 
   5. After flipping over, you may wish to add another stitch to give the blanket a more "professional" look.  I did so with a 1/2" seam. 
   6.  Trim off any extra threads and TADA! 
A soft, warm and, best of all, large baby blanket for a quarter of the cost of buying one in store.  Now I'm ready to hurry back to JoAnn's to pick up some more material to make one or two for Aria! 

Best of luck... XO! 

11.01.2012

Fabric Covered Art Tutorial

In an attempt to make my desk area look more welcoming, I wanted to create a larger bulletin board of sorts.  After shopping around at several stores, I realized how expensive large cork boards are and decided to try something different.

Our local Ben's Five and Dime (formally Ben Franklin) had Styrofoam boards on sale 2/$1.50 so that was my solution.
I glued the 2 boards together for a thicker look
I already had the fabric I wanted to cover the board with.  I picked it up on a clearance endcap at Target several months back because I loved the pattern, even though it was originally a body pillow case.
My board was wider than my fabric so I trimmed down the board with a box cutter - very similar to cutting Sheetrock
Start wrapping the fabric around the board and hot glue.. don't be afraid to use quite a bit, we don't want the fabric to become slouchy.
Wrap it like a present
I tried using the screw in hooks on this, but it made the board stick away from the wall more than I wanted so I opted to try to rig some pop-tops for the hanger.
And it's finished... I'm so happy to finally get it hung up on the wall above my desk.  I LoVe this fabric!

Best of luck!  XO


10.29.2012

...Big Sigh

A quick note to let you know that SOME (big some... but I'll take any some at this point) of our sweet little one's crying has been replaced with adorable smiles and fun coos.
Responding to her silly sister's attempt at making her laugh
LOVE HER!
And with a few more smiles and few less cries... I've been able to do a few things around the house, which was in desperate need of a little attention over the last several weeks.

I will be back later this week with a few projects I've finished up.  

Until then... XO

9.30.2012

Help me

For the last 3 weeks, we have been trying desparately to deal with a baby girl who cries in pain from what appears to be gas.  I am at my wits end after trying anything and everything we can think of to help her deal the pain. (gas drops, leg ups, warm towel on tummy, etc.). In addition to the gas, or maybe in conjunction, the little one is not having bowel movements often... As in every 5-7 days.  The doctor has told us this may just be her "normal" but the gas and crying is getting worse.

What can I do for this sweet, little, miserable girl??


9.07.2012

Preeclampsia

How's this for a bit of drama..

Short hours after posting about my beautiful new baby, I was rushed to the ER with blood pressure of 172/100.  (as someone who has never understood how blood pressure works, I was less concerned than it seemed everyone else was at first).

So here I sit, in a hospital room again waiting for the medicine to work its magic and let me return to my family at home.

We were informed by the doctor shortly after arriving that preeclampsia is a condition many pregnant women get that involved high blood pressure but usually corrects itself after delivery.  I have to go off the charts and get it AFTER delivery with no other preexisting conditions, and frankly... They don't really have any idea why I have this.

12 hours of magnesium sulfate IV, 3 blood pressure pills and a little bit of rest later, I feel shaky with a terrible headache, stressed to the max about my girls, and more tired than I felt after our first night home with Aria.  Good note, my BP is down to 130/80... Still high for me, but I'm out of the seizure high levels for now. 

And maybe I can go home soon...ish.

Until then.. XO

9.06.2012

It's a Girl!!

The day has finally come and gone.  We have another beautiful daughter to add to our family.  Meet Aria! 
Hours old
Packed up and ready to go home
Super proud BIG SISTER
Relaxing after a big meal
Aria was welcomed into our lives on Friday night after a very fast paced labor that left us running for the hospital, a ride in the ambulance and a painful delivery a short 1 hour 21 min after my water broke.  Whew... but she's here and she's perfect. 

XOXO

8.27.2012

It tastes so bittersweet... preschool today.

Today was the big day!  Chloe's first day of 3 year old preschool.  Something I've been preparing myself for since she was born... something I completely changed my mind about last night and wanted to keep her home forever.
Chloe has also been through a range of emotions over the last few weeks about going to school, but woke up READY TO GO! 
Working on seat work
Chloe and her teacher
Social circle time
And when it came time for goodbye... my brave little girl... cried and screamed :-(   Worst mom award as I walked out and left her there!

P.S.... Now that the first day of preschool has come and gone, let's get this baby outta here! 

8.22.2012

Confession

I absolutely hate when my 3 year old refuses to nap.

It drives me completely nuts to hear her talking to herself or her babies when she's supposed to be sleeping.  It kills me that she makes up having to go to the bathroom 3-4 times.

How do you get your resistent preschoolers to nap?

8.20.2012

Crying Wolf

Although I'm over 37 weeks pregnant and more than ready to meet this little bundle... I'm not one of those people who like to use pregnancy as an excuse to not do something or complain about the aches and pains [insert big lie here].

I really really try not to complain about it, but I have to say... 2nd pregnancy sucks!  I was pregnant with Chloe 4 years ago, at the ripe age of 23, and maybe my younger body was capable of handling such reactions but this time around, my poor ol' torso is feeling the pain inside and outside.  I have been experiencing some pretty nasty "Braxton Hicks" contractions for a few weeks now and have been certain, at least 3 times, that this little girl was going to make her appearance.  On Thursday, I was so certain that I drug my hubby home from work early with 6 minute intervals and made him pack up the car and drive me right on down to the hospital... to be patted on the leg and sent straight home until they "became more regular and intense".  (Don't they know that I'm not making these things up?!)

So since Thursday... after my embarrassing 3rd "This is it!" moment, I have decided to keep my mouth shut, to anyone who asks about the pains, aches, contractions and uncomfortableness.  Don't get me wrong... they still hurt and come more frequently than I want, but I hate being the poor miserable pregnant girl who is continually crying wolf.  Next time... it will be for real!
Until then... XO

8.07.2012

A Pretty Flower Girl

One of my good friend's sister is getting married in less than a month and she asked me to create a flower girl shirt and tutu to dress her two adorable nieces in.  The tutu I had no problem visualizing (they're all about the same), but I was really struggling with an idea for the flower girl shirt.

Thanks to my recent pregnancy insomnia... I was awoke in the middle of the night with an inspiration from Love Maegan I'd seen a few months back. It would be perfect to go with a giant fluffy tutu without being "too much".

I needed to make 2 shirts (one for a 4 year old and 1 for an 18m old).  Luckily, I could find a V-neck shirt for the older of the girls, but I have never seen a V-neck onsie (have you?!) so I set out to create my own.  This youTube clip helped me gather my thoughts around how to accomplish this (and I loved how short and to the point she made it!)

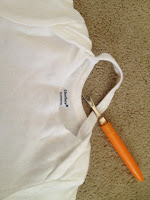
I started just as Wendy did by ripping out the seam around the neckband of the onsie.

Cut the neckband in half, as well as cut a small amount of fabric from the shirt to create the V look.  ( I was nervous about this part... I don't want this cute 18m looking too, risque).

Being my first time re-sewing a collar to a shirt, it didn't come out as nicely as I'd hope but since I was going to be covering it with beads, I let my perfectionist self go and called it good.

Start adding beads/pearls/adornments across neckband.  I did a variety of sizes and mixed white pearls with slightly pink pearls at first.  (When I was almost finished, I found some really pretty dark purple beads to accent the tutu and had to add them). 

When you're happy with the look of the beads, you're done!  A fancy look, without the danger of strangling on the pearl necklace!  I can't WAIT to see these on the girls!

I hope you enjoy making this!  Until next time... XO!

Related Posts Plugin for WordPress, Blogger...